Friday, February 17, 2012

Jewelry Chest/Night Stand


A co-worker recently asked me if I would be interested in building a piece of furniture for him. His timing was great as I was sort of idle in my shop and was looking for something to build. He told me he wanted a jewelry chest that would also serve as a night stand. The idea sounded sort of funky, but once I began to talk with him and
got his ideas about what he was looking for, I was rolling ideas around in my
head and knew that the project was going to be a fairly easy one.

I still thought the idea was sort of off the wall, but hey, he was footing the bill and as I have
always said…the good thing about custom woodworking is that you can build anything that anyone wants….well, up to a point.

So, here it is…red oak. The first project built from some red oak lumber that I bought out in Pennsylvania. I think I will email the supplier a picture of this to show him. Anyway…the project
was a good opportunity to use my dovetail jig for the drawers and also to get into the tapering of legs. I had done it in the past, but not for a while, so I was jonesin’ for the opportunity to do
so again.

The surface of the table stands thirty inches off of the floor and the upper part that will be used to hand necklaces within raises it another foot. This project also allowed me the practice of keeping the grain orientation of the face skirt of the table. If you take a look at the front of the piece, look at the drawers and the surrounding framework above and below the drawers. You can see that the grain pattern flows as it was all cut from the same piece of wood. For this purpose.

I made my first ever drawer divider with this project and although it wasn’t anything difficult…it was still my first attempt at it and it really makes the drawer it’s in look great. And while I am talking about the drawers…I have to say that I am not that elated about the flocking in the drawers. I have flocked a number of other things and this product simply doesn’t do a good enough job in my opinion. “Flocking”…the felt like lining in the bottom of the drawers is a new innovation whereas you “paint” the surface that you want the lining and then pour powdered felt onto the wet paint and cover all of the wet spots and let it dry. When dry, you empty all of the loose material and you have left a nice edge to edge coating. Trouble is… you really don’t get a satisfactory lining thickness. The search goes on for a better answer for this.

For some reason, I had a bear of a time getting the dovetails just right on the drawers! Don’t know exactly why. The Leigh jig is one of the more exacting jigs and yes, it takes some hit and miss trial and error corrections before you are dialed into the fit, but I just couldn’t hit the mark this time for some reason.

All of that is water under the bridge now though as the project is done and will be delivered within the next few days. Hope everyone is happy with it!

Old Toybox


Interesting story behind this toy box. This is one of the first things I ever built. Built it way
back in my high school years. Didn’t use any fancy wood…just plain old plain Jane pine that didn’t have any character at all. Well, I think I remember building it for my youngest brother Mark. But over the years…I lost track of it and just plain old forgot about the darned thing.

Fast forward like thirty or more years and I am helping Mark clean out his home and garage down in the Cape May, NJ area and tucked back in the corner of his garage is this old forlorn looking box. All beat up and finish faded. Got a bit closer and I recognized it. It was the toy box!!!
Wow..talk about a blast from the past. It was a mess. Humidity and heat had wreaked havoc with the base trim and the trim around the lid. It was shot to say the least. And the original clear finish was completely gone and the stain was even faded quite a bit. Now, I normally would have chucked the thing. But after taking a good look at it, I determined that it could be saved. My wife Karen suggested that I take it home…refurbish it and give it back to Mark with the express purpose of it being for his impending newborn baby. Sounded like a great idea and it came home with us from the Jersey shore and I set about refurbishing.

First…off came the old trim. Both the bottom trim and the lid trim. Both were completely
shot. The corner joints needed regluing and the entire thing simply needed a sprucing up. I completely sanded the inside and outside down to almost bare wood, but kept its patina for old times’ sake. I used a heavy paste type stain so that it would sit on the wood and penetrate well
into the old wood. Once that was done, I made up new trim for the bottom and the top and attached them and stained them a slightly off color of the box for contrast and then when it was all dry…shot some finish on it.
No, it’s not one of my greatest projects, but it wasn’t meant to look like a new piece. That would have destroyed its beauty and disrespected its heritage and age. The recipients were very happy with it and the story that goes with it….that being that back in the early seventies, this toy box was built for Mark and after years of use and neglect in its later years, it was brought back to life with a little work by its original builder and now it will enjoy a new life serving the daughter of
the original user.

Thursday, May 5, 2011

Picture Frames


I have done lots of picture frames in the past...many of them in the style I like to call "shadow box" style. I have had these posters from the Flemington Speedway Historical Society for a while now and have always intended to mount at least one in a frame to add to my bar room collection. Being that it would go into the bar room, the style and make up of the frame was already decided for me since I had a number out there already...all in the same style...that being made of red oak with walnut inlay in the face of the frames and in the shadow box style.

Since I had three of these posters, I thought that hell, I could make three frames just as easy as one and I could do something with the other two. I decided to give one to my racing buddy Sparky and I would donate the other one to an annual chinese auction that is held at the New Egypt Speedway on a night called the "Friends of Mike Night" a night dedicated to the memory of a former speedway fan that died way to early. The proceeds of the auction, as well as many other revenue streams all goes toward the nights racing division purses. I thought it a worthy cause.

The poster involves the Flemington Speedway all time top ten modified divisions winningest drivers.

Antique Hoosier Cabinet


A fellow co-worker approached me about refurbishing an old kitchen Hoosier cabinet that he and his wife owned, but were hesitant to attempt to completely redo themselves. So, I took on the job and the piece of furniture was in pretty good condition structure-wise and all it really needed was to have new doors fabricated, the entire surface sanded down and repainted, a new tambour door added, new casters, some minor repairs here and there and just some general TLC to bring it back to life. I also fabricated a slide out drawer for inside the lower portion.


I was thrilled to find that I could order the same exact hardware that was on the piece and I again was thrilled when the owners wanted it to be painted the same color because it really appeared to me to be an old time color.


I found it odd that the tambour door was slid into the unit from the front....this allowing the entrance points to be quite obvious. I have always seen them put into units from the back, therefore hiding any extra notches or slots to allow for the thing to be installed. I really think that this piece of furniture was originally not painted since it was all red oak underneath, but it would have been a bear to try to remove every last bit of paint from the piece since oak has such deep pores in its surface makeup....it would have bordered on the impossible to completely clean it up.


The project was an enjoyable one to work through...I have never really restored an antique before, so it added another thing that I have accomplished in my shop.


Wednesday, January 12, 2011

Heart shaped jewelry box


This is the most recent item to come out of my woodworking shop. It's a red oak heart shaped jewelry box that I made for someone who is special to me who just so happened to mention that she loves hearts. I took the idea and ran with it. I found a nice project, if I remember correctly, via one of my woodworking forums that I frequent and modified the project to my own liking. I actually downsized it a bit and then went to work and what you see is what I ended up with. I actually screwed up a first attempt at the project and had to scrap it. The barrel hinges gave me fits and there is definitely a learning curve on how to locate them on a project such as this. The actual project needed to have a jig or two made to complete it, but in actual time, it wasn't all that lengthy in fabrication once the jigs were made. The velvet lining is a pillow type cushion that I hand sewed to fit the interior of the box. I hope she likes it!

Saturday, December 11, 2010

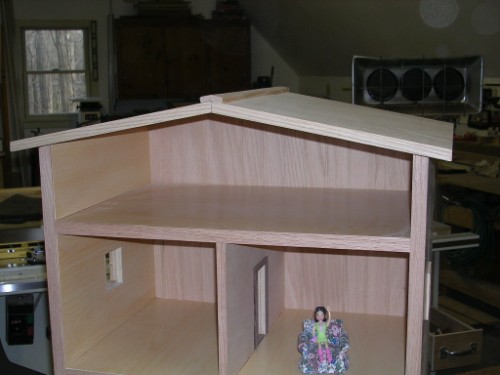
Dollhouse


A coworker came to me a week or so ago and asked if I could fabricate a dollhouse for his daughter using some left over cabinet grade prefinished plywood. I said sure and took what lumber he had and ended up using some scrap I had laying around the shop. Put this simple, straightforward dollhouse together and will be handing it over to him in another day or so when he stops by to pick it up on his way home from his current job.
I used some half inch thick ply for the inner partitions and some 1/4" oak beadboard for the back wall. He also found some 3/4" red oak shelving that he had torn down years ago and brought that to me to use for the roof of the house. Took roughly four or five hours in total to construct this. I laminated some thin oak strips to the faces of the raw plywood to dress things up and used some walnut to trim out doors inside the rooms and their thresholds. I hope she likes it!

Tuesday, November 16, 2010

Candle Holders


With Christmas rolling around soon, I figured that I should get started on making some gifts for family and friends. My "Wood" magazine always has something in it around the Fall season that is relatively small enough for mass production, yet is nice enough for gift giving. This year, it was these candle holder sets. Designed to hold the long, slim, "taper" candles, the design was easy to run out and with the aid of just a few simple jigs, the process was a snap....though I still grow weary of the mass production process.

Per my usual mode of doing things...I made these out of walnut and red oak. I just like the way the two species compliment each other. I simply needed to order enough of the brass ferrules from Rockler Woodworking for the number of holder sets that I planned on making. I believe I made a total of 25 sets with each set containing three holders, each a different height.