Wednesday, December 30, 2009

Fireplace surround/cabinet


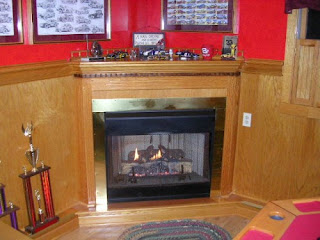
Another project that came out of the shop when I was building the bar room was this fireplace. With our home already pretty much 100% electric, I didn't want to add any more electrical useage to the house, so I opted for a ventless, propane fired fireplace and this one absolutely does the trick in heating up the bar room. I keep it low when the room is not in use, so when I go out there to prepare for entertaining, I turn up the heat with a remote that also serves as the thermostat and within ten minutes, the room is up to the desired temp and the fireplace doesn't kick on again for what could be up to hours.


The cabinet/surround was basically straight forward carpentry with some nice woodworking added in - such as the walnut dentil moulding. I did have to adhere to some code enforced measurements as far as dimensions around the firebox and how high above the firebox the top of the cabinet could be and how far out in front of the structure it could extend. With those things in mind, it was still easy to build. It came out very nice in my opinion.

Dart Board cabinet


Those of you who may have seen the YouTube video tour of my property and bar room may have noticed this dart board cabinet. I quickly highlighted it in the video tour of the bar room. In case you missed the video tour - you can see it here:
This cabinet was one of the last things that I built for the room. I wanted convenient dart storage and accomplished that with in-door storage that holds them firmly and they are always there ready for playing when you open the doors. I finished the red oak and walnut cabinet with high gloss Waterlox because I had used that for the rest of the rooms vast amount of wood and wanted it to blend in with the rest of the room and it does quite well. I added a small strip light in the top of the cabinet to assist in illuminating the dart board itself. All in all, a very nice project that was fairly simple to make.

Tuesday, December 22, 2009

Kitchen cabinetry


When our son Jim and his wife Mari purchased their home out near Allentown, PA, the home needed some sprucing up - as any home would. Included in that plan was replacing the horrid kitchen cabinets that were in place. I volunteered to build them, as this would get them new cabinets and save them a ton of money in the process. They REALLY needed new cabinets!


Nothing fancy - as at the time, they weren't even sure if they would be staying in the home for a long period of time. I suggested that they didn't go with something such as maple, oak or cherry since if they were going to move out in a few years, why bother. So, we went an inexpensive route and they still got some pretty darned nice cabinetry and the bonus that it was built by family. It really made a difference in their kitchens appearance.

Cigar/Cigarette pack holders


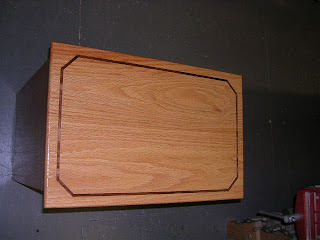
I ended up with a good amount of walnut left over from the tissue box project just below that I simply couldn't throw it out. It was already planed down to 1/4" thickness and I just couldn't bring myself to throwing it out into the kindling barrel. I came up with some other Christmas gifts for some buddies who smoke cigars or cigarettes. I made these little boxes that hold a cigarette pack or in the case of the photo accompanying this entry, a cigar holder. This box size is designed to hold two packs of the Middleton five pack cigars. Pretty simple design. I actually thought of this project because it allowed me to try a clamping idea that I had seen in the past, but had never tried. It involves using tape as a clamp mechanism instead of actual clamps. It actually works like a charm on small projects such as this.


Walnut tissue boxes


One of my most recent projects are these tissue boxes that I built for Christmas gifts. I originally made 14 of them - a few for our home and the rest for family and freinds for Christmas gift giving. I posted a picture of one of them on one of my favorite forums on the internet and a number of people expressed interest, so I wound up making over thirty more of them and sold a number of them to people all across the country and even to one guy up in Alberta, Canada!


I hadn't used my box joint table saw blade set in a while and wanted to get it out and make something with it. These tissue boxes were the result. Another interesting note about these boxes is the fact that the walnut used to make them was procured by myself from the New Hope Solebury School district. They had two walnut trees come down near their field hockey fields and wanted to know if anyone was interested in them for firewood. Fortunately, my wife heard about it (she works in the school district business office) and I claimed them before the trees were cut up. I hired a gentleman with a portable sawmill to come to the site and cut them up into useable lumber. I got a bargain in the process! The sawmill fee, some help and supplies all totaled around $400. When I added up the total board feet of lumber that I got out of the two trees, I ended up with about $1,400.00 worth of lumber. It definitely was a score. Anyway, here is a picture or two of the boxes.


Laundry Trellis'


The wife and I grew tired of the same old same old t-shaped clothes line support structures that I had built over the years and eventually having them either rot away or simply become week and not very sturdy. We bit the bullet the last time we needed to replace them and sprung for cedar and I built these really nice trellis structures that should last quite a long time. I started by digging down deep into the ground and lining the holes with rigid plastic piping and then set the trellis legs into them and filled them with stone dust that will (1) firmly hold the legs in place and (2) allow drainage so that water doesn't continually remain around the bottoms of the legs and eventually lead to rot. The stone dust packed down very firmly and after a number of years now being out there, the structures are as solid as ever!


As you can see by the picture, I have hostas planted below them and in the springtime, I plant some kind of climbing vine that eventually covers the lattice work and provides a beautiful scene in the yard and makes it much more pleasant for Karen when she is out there hanging clothes to dry.

Saturday, December 19, 2009

An Armoir Home for our TV


We knew for a while that our television was heading South. When we finally got around to getting a new one, we ended up buying a nice sized Vizio flat screen LCD TV. I also knew that when we did get a new television, I wanted to build this nice entertainment type center for it for our family room. Well, I mulled over design ideas in my head and just couldn't come up with an acceptable style that I was comfortable with. So, I changed my ideas around some and came up with this armoir style cabinet and it really came out nice. Constructed mainly of 3/4" oak plywood, I designed angled sides into it instead of having it simply be a big box in our family room. Another consideration was the type of doors I would have on it. I couldn't just have two big "barn door" type doors on it because when they would be opened up for viewing tv, the one on the left side would be swung far open into the path to get out to the kitchen. That made the idea of bi-fold doors the most sensible.


I also had to keep in mind that the rooms thermostat was located on the wall just behind where the tv has always been located. With an entertainment center type of thing, I could have had it within an opening of the center. However, an armoir style piece would totally block the thermostat. So, I was limited as to how high I could make the thing stand. That wasn't that much of a deal as I did manage to design it large enough to be functional and still grant access to the thermostat on the wall. You can see it just above and behind the armoir. There is closet space down below the tv compartment and also a shelf in the upper section for the sattalite box and DVD player. One other thing I incorporated into the design was embedded magnets in the doors that act as catches to keep the doors closed when not in use. Some custom shop-made walnut dentil moulding circles the front and sides of the cabinet to set things off.

Captains Bed


I have heard these type of beds being called Captains Beds and also Platform beds. Either way, this one had many challenges. It was a very involved project that kept exact measuring a key thing of importance. It is basically four parts - the headboard, footboard, main body and the drawers. Everything starts with the dimensions of the mattress itself. You go from there with the sizing of the bed structure itself. The headboard and footboard needed to nest just outside of the main bed body so measurements were critical with these. I really wanted to try something different for the headboard and did just that in two areas. The sides of the headboard are actually constructed of oak plywood. Because of that, I needed to veneer some actual oak hardwood to the faces of them to conceal the plywood laminations. I have done this type of thing plenty in the past, but I had only done it on straight configurations. These headboard sides were rounded at the tops and that presented a bit of a challenge. The other thing I tried on the headboard was the curved top. Done in just one piece, it wasted a bit of wood, but I was willing to sacrifice the wood in trying the process of making the thing and learning a thing or two along the way. Dovetailed drawers are incorporated into the bed body both along the side and in the footboard. Two of the four in the footboard are actually faux drawers.


The bed, in it's entirety, is a heavy thing.....but it isn't going anywhere once it's in position! It was a pretty challenging project and a satisfying one now that I look back at it.

Keepsake Box


I tried a few new things with this project. I wanted to try a serious beveled edge on the lid - including an inlay. A totally seperate inlay in the field of the top and I also took a stab at some shaped feet. This project also gave me a good lesson on using my new box joint saw blade set. The box joints turned out great if I must say so myself.

Trinket Boxes


A simple little box plan in one of the books I have in my woodworking library had me intrigued. Not so much the project itself, but the process in how it was made. It required a simple jig for routing out the recess inside the box. It also was a great way to use up some small pieces of otherwise sort of useless walnut. I had some small pieces of spalted maple laying around also and I could use those for the lids.......the project was on.


Radiator Covers


Some friends contracted me to fabricate some enclosures for their cast iron radiators in their home. I had done these before and they are fairly simple to make. One concern that I have always had about building these, is the heat that is eventually going to be inside of them and how it might affect the wood. I tried something with these particular covers. I added some insulation on the underside of the tops in the hopes that it would reflect the heat towards the openings in the front. I had always wanted to build something with a slatted style front and this project was a good one to try it on. Looking back, with the number of covers that I made and the number of slats in total, man, it was a lot of work making all of those mortices!!!

Thursday, December 17, 2009

Behind the Bar Shelf Unit


I built this shelf unit for the wall behind my bar in the bar room during a period of being laid off from my job. It served at least two purposes - (1) it needed to be built anyway and (2) it kept my mind off of being unemployed.

Corner Hutches


My Brother Dave and his Wife Diane asked me if I could build them some corner hutches to go into their newly remodeled dining room. I was free and had the time and the desire, so when we agreed to a price, the project got underway. The hardest part of the project were the doors. I had never attempted a rounded top to any doors and it was a challenge, but I got it down pretty good. Templates can be your friend!.....and a good router and template bit ;)


Anyway, they came out pretty nice. I pre-painted the bottom door panels. This is common since wood expands and contracts according to the ambient moisture content of the surrounding air. This is what makes those annoying little lines of unfinished wood you will see, mostly in the wintertime when the air is drier. The wood shrinks and the panels get smaller and along the outer perimeter of them, you see unfinished wood. By pre-painting the entire panel, this eliminates that.


End Table


I built this end table as a gift to our neighbors. Janet and Jeanie are pretty much always available and willing to take care of our cats when we need to get away for a day or two or three down the shore or wherever. I thought it would be nice to thank them with a gift or two out of the shop. This is one example. I whipped this end table out in practically no time. It features oak construction and has walnut banding around the drawer and a nice walnut inlaid band around the top. Jeanie like this so much, that she claimed it as hers.

Key Fobs Anyone??


Simple and straightforward little project that made use of some of the scrap wood that was laying around the shop. Much easier to make than it appears. You basically do a number of dados and inlay other contrasting wood and it all combines into one long "loaf" of wood when it is finished. Then, you simply slice the fobs off of the "loaf" one at a time. From there it's a matter of sanding and rounding over the corners, drilling a hole, putting on a finish and attaching a chain. I have plenty of these laying around. The wood involved in these are ash, walnut and mahogany.

Oak/Walnut picture frames


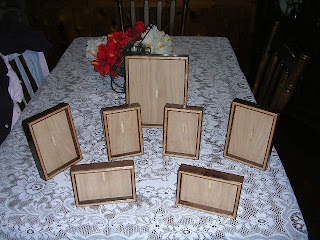
I have made numerous picture frames in all sorts of combinations. These were an experiment in inlay work. The basic frame is walnut, but if you look closely at them, you can see that I inlaid a band of oak in the face of the frames. These frames are a "shadow box" style and they were a blast to make. Trouble is - I don't have any of them around. I think I gave them all away for Christmas. I will have to make more of these. They are really nice.

Sideboard


Another project that was built for Jim and Mari. This time, it was a wedding gift. Jim had seen this sideboard in one of my woodworking magazines and really liked it and asked if I could build it for them for them as a wedding gift. I was up to the task and set forth with the project. Really nice piece of furniture. Wine rack down below is a nice touch. Plenty of storage for stuff on each side behind doors. I think this may have been my first attempt at flat panel doors and cabinet ends.

Potato Bin


This was my first attempt at recreating an old relic. Karen had found this old potato bin somewhere. I don't even remember where she said she picked it up. It was/is decrepit, but it serves it's purpose which is being a display stand for various stuff, according to the season. I decided to make a copy of it and I had a bunch of old pine that was originally a canopy bed that I had built a long time ago, that I replaced with the oak bed that is detailed elsewhere in this blog. It is pretty much a match in size, but I did switch around the handles from the drawer and bin areas. I just liked them better that way.

Jewelry Cabinets


This particular project came from out of one of my woodworking magazines. I don't often build things from plans. Most of the time I design what I build. This was an exception. I have built four of these cabinets thus far. They aren't that difficult to make and they are very nice indeed. Spalted maple is used for the door panels and red oak and walnut are used in the construction of the rest of the piece.


Scotland Jewelry Box


Glasgow, Scotland - yessirree, it's a long way from Ringoes,NJ. But this jewelry box made the trip. And, I might add, at a bit of a cost also. That is why I am so glad that the postage was covered by the person who had me build it for them. One James McGeachy and his girlfriend Alana are members of an internet forum that I frequent and they had seen some of my work that I posted in the occasional thread. James eventually contacted me and asked if I could build him a jewelry box. I asked what he had in mind and he told me, no real ideas....."just build me one." So I did. They loved it. I have a picture of Alana posing with the box, but I don't think it would be appropriate to post it here where young eyes might spy it. Let's leave it at that. You want to see the photo, you can visit my shop where it's posted on my wall at the top 'o the stairs.


The bedroom furniture


No doubt, the our bedroom got a major overhaul once I had my woodshop up and running! I literally built every piece of furniture in there now. I started with the entertainment center which for all intents and purposes, was to contain the television for us to watch while laying in bed. Next up was the bed. I had seen a bed in a Sunday paper pull out advertisement and liked the raised panel design and pretty much copied it. The nightstands, which you can see alongside of the bed, were the second items of the overall set that were built.


Karen's dresser was up next and while I wanted to make her something extra special, she just wanted a basic dresser - so that is what I built her. I did add a bit of flair with the mirror. I added a small raised panel at the top of it and then topped it off with a beveled edge mirror. Really added to the class of it. I waited for the end to build what I wanted for a dresser. I wanted an armoir style dresser and built just what I wanted. My old dresser suffered from always having a pile of racing magazines and newspapers, woodworking mags and other stuff piled on top of it and it was always unsightly and always threatened to fall all over the place. With my new dresser, I had a compartment that was dedicated to all of this stuff. Now it was behind closed doors and out of sight. When it gets to crowded in there, it's time to go store it away.

Treasure Chest


Here is one of the nicer projects. Our son Jim and his future wife Mari asked me if I could build them a treasure chest for their upcoming wedding. They wanted an island sort of themed wedding dinner and this chest was to be used for guests who had gift cards to insert them into. After mulling over the idea of how I was going to do it, I came up with this. Turned out really nice. Once the wedding was over, I replaced the top slat with the slot in it with a solid slat and they now have this treasure chest in their home.