Thursday, August 25, 2016

Small Hope Chest

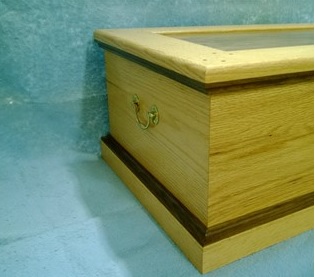
I was contacted by an old racing buddy in regards to his wishes to have a hope chest built for a young lady who was a girlfriend of his son.  He was aware of my woodworking and in fact, had purchased some picture frames from me in the past.  When he hit me up about the project, I had some free time open and told him that I was willing to get right on it.  He drew up some plans and emailed them to me and after a little bit of communication back and forth between us in relation to the design...I set upon building it.


    The picture frames that I had fabricated and provided to him were a combination of red oak and walnut...(one of my favorite combinations) and he liked that look and wanted the same look with the chest.  A simple, straightforward project in design....it did provide me with a new concept that I had never incorporated into any past projects.  He wanted reinforcing splines in the 45 degree corners of the chest.  I was intrigued and welcomed the new challenge.


  I used walnut as the upper and lower trim of the box, as well as the panel insert in the lid.  Walnut was also used as the "floor" of the box and the cleats that supports the movable tray inside and the bottom of that same tray.  The splines in the box, the bottom oak trim and the oak tray were all walnut also.  As a finishing touch, I also added four decorative walnut dowels in each corner of the lid.


Thursday, March 24, 2016

Trestle Style Dining Table

 I had never attempted to build a dining table, so I was intrigued, and ready to give it a shot when a friend asked me if I was interested in building one for him and his family to go into the home that they had recently purchased.  I fabricated it from poplar....a hardwood species, but one of the softer ones and in hindsight, it was a learning experience.  While I have always enjoyed working with poplar due to its fine texture and its stability in regards to expansion and contraction with moisture conditions and also its ability to mill very cleanly, I still will have to think about using it again for the main wood for large projects.  Just a tad to soft for my liking.  The entire project took five or six days from procuring the lumber to wrapping up the build of the table.  The staining and finishing of the table and the chairs took a few days more.  Customer chose Minwax Jacobean stain.  I thought it would turn out very dark, but it actually was pleasing to the eye at the end result as the "green" of the poplar mixed well with the tint of the stain and the result was a pleasing shade.  Topped it off with several coats of Deft satin brushing lacquer, sprayed at a dilution of 20 percent.  Just a few pictures of the process:


The chairs were purchased unfinished by the customer and I stained and finished to match.


Friday, February 26, 2016

Laptop writing desk

A number of year ago...I made this laptop writing desk for our neighbors high school aged daughter.  I had wanted to build one just because I had never done one and there were simple elements of the build that I wanted to try.  So, I killed two birds with one stone with the project.  If I have any regrets about the project, it's that it is a little heavy since all of the components are 3/4" thick and I could have gone thinner and still maintained good overall structural integrity, but hey, you never stop learning and becoming a better woodworker, so it served a purpose.  I like it...I think it came out nice and I like the simple design.  I hadn't taken a picture of it back when I built it.  I document all of my projects with pictures and I never got one of this one.  I have wanted to approach the neighbor about getting a picture of it, but I just never got around to it.  Today, coming in from picking up the mail...I saw the neighbor in the yard and asked about it.  Simple as that.


Friday, January 29, 2016

Bathroom Remodel

Catching up a little bit....this bathroom remodel occurred in our home almost a year ago now...well, a little less than that, but I have been lax in keeping this blog up to date.  The bathroom remodel was scheduled to be done after our kitchen remodel was complete.  The kitchen was done two summers ago and last spring...the bathroom remodel commenced.  The transformation was incredible.  The former bathroom....in a word.....was UGLY.  It was outdated....worn out and just plain a disgrace!  It totally gutted the room down to the studs and cieling joists and started over.  New drywall, new floor and cieling...new tub, toilet and sink.....tiled the bath surround, fabricated the rooms trim...moved some plumbing to better be protected from the piping freezing and built the vanity, mirror, a radio shelf and the cabinet in my shop.  In total, the entire job took approximately three weeks from start to finish and was definitely well worth the effort and temporary inconvenience!  That all being said....here are a few pictures of the stuff I built for the bathroom remodel:


Pair of night stands

A friend that has commissioned me a handful of times approached me to ask if I would like to build him and his future wife a pair of nightstands for their new home they had just recently purchased.  I was in the middle of the hall table project down below, but as soon as I was done with that, I could start on his needs.  They wanted me to match the tables up with a piece of furniture that was already being used in their bedroom to sit a television on.  It looked like either maple or cherry and since I was already in "maple mode" from the hall table project just before it.....I chose to go with the maple....to be exact...more ambrosia maple.  I always hate to stain wood, but one has to go with the needs and desires of the customer and they wanted a dark finish.  This finish is Verathane "Carrington".  The clearcoat is Deft satin brushing lacquer which was diluted 20% with thinner and sprayed from my Wagner HVLP spray gun.  I have fallen in love with Deft's finishes as they are very forgiving as to the expertise level of the sprayer and it dries quickly....needs minimal sanding between coats and often just one sanding.  I usually go with three coats and then a light sanding and however many more I want to build up.  And it provides a silky, satiny feel to its finish once it is done.  I just love it.......and that is across the whole spectrum of glosses from the satin through the semi gloss to the high gloss....all the same results.  One last thing....for the drawers, I used, once again, those plastic drywall corner guards.  I hot glue them to the bottom/sides of the drawers and they provide a super smooth gliding action that will last an awfully long time.  I have this same system on furniture in our home that I built many, many years ago and I have had no breakdown.  It's a very cost effective and trustworthy way of providing a smooth sliding drawer.


Friday, January 1, 2016

Hallway Console

A work associate of our son asked him to contact me to ask if I would be interested in building this console table for her new home.  A few months ago...she also wanted me to build her a coffee table..but at the time, I was tied up with other projects in the shop and the time frame just didn't jive with her schedule and she had to go ahead an purchase one.  However, when this request came in....I did see some open time to build this.  First because there simply was time for it, but also because it would be a quick turnaround and also, the scale of the project intrigued me.  I rarely get to make a table seven feet long.  It adds just a touch of difference to the norm in the shop.

  I was supplied with this picture to go off of in duplicating it.

  At first, it was requested that the top be stained dark to match an existing dining table that would be in close proximity of the console and the rest of the table would be painted by the customer.  Then, I was told to go ahead and stain the complete thing.  And right before I began to mill the parts, particularly the legs, it was requested to make the table taller.  A day later with the request would have been to long as I would have cut the leg blanks about four or five inches shorter than needed.  But, time was a nice person and we raised the table height.  I picked up some very beautiful "ambrosia" maple from my supplier and I wanted so badly to finish the tabletop naturally clear, as ambrosia maple is so beautiful when done so...but the customer could not be swayed.  Hey, the customer is always right and it was all stained.  Had a bit of a problem with some blotching, as will happen with maple, but some corrections and an application of wood conditioner to even out the stain absorption corrected the problem and I really loved the reddish brown hue that resulted.  This stain used was Verathane Cogniac.  Clear coat was Deft high gloss brushing lacquer...diluted 20% and sprayed on.


Thursday, April 9, 2015

Silver Medal Shadowbox Wall Display

Well, I am just about ready to begin my upstairs full bath renovation to complete our major home remodeling project after phase one...last years kitchen remodel came off successfully and now, the bathroom will bring our home up to our liking and what we have been waiting to do for many years.  I had completed the furniture for the bathroom (vanity, mirror frame and a wall cabinet) and was not willing to take on anything else for anyone since my attention would be devoted to the bath remodel.


 Well, while I am just about ready to get on with the project....I have had a small amount of time to squeeze out a small little display frame that my Brother Dave asked me to make.  Apparently, a nephew of Dave's recently won a silver medal along with the rest of his ice hockey team and Dave asked me to build a nice display to hang it on a wall.  This is what I came up with.  I wanted the frame to be as light as possible, so I thinned down the walls of the shadowbox to like 5/8" to shave off some weight.  This frame would have normally needed two recesses milled into it.  One for the glazing on the front of it and one for the back of the box to fit into.  This would not have left much meat on the back of the box to mount needed hardware.  I solved this problem by tacking on some thin walnut strips to the top of the box and extending into the "field" of the viewable portion of the framework.  This not only served as a decorative effect being used with the naturally finished red oak, but it also served to hold in the glazing.....this way, I eliminated one of the recesses needed.  Custom milled up moulding was rabbited around the outside of the box, now with a walnut feature added to it, and features some beading around the perimeter.

   Dave wanted a white background in the box and I think that was an excellent choice since it really highlights the red, white and blue colors of the medal.  Some foamboard is behind the fabric and then some 1/4" luan ply serves as the back.